Tuesday, February 13, 2024

Homemade Ricotta

Adapted from The Food Lab by J. Kenji López-Alt (W. W. Norton, 2015)

Makes about 1½ cups

To make this recipe, you need an instant-read thermometer. I make this in an 8-cup Pyrex measuring cup; you can certainly use any microwave-safe 2-quart container.

2 cups whole milk
2 cups heavy cream
½ teaspoon kosher salt or fine Italian sea salt
¼ cup distilled white vinegar (must be 5% acid)

Pour the milk and cream into an 8-cup Pyrex measuring cup, which is what I use, or another microwave-safe 2-quart container. Stir in the salt and vinegar.

Microwave until the mixture reaches 165°F on an instant-read thermometer. In my small microwave, this takes about 8 minutes. Stir gently for about 5 seconds—the curds should already be forming and separating from the whey.

Pour into a fine sieve lined with a white mesh vegetable bag or cheesecloth. Cover with plastic wrap and let drain until it reaches your desired consistency. The longer it drains, the drier the ricotta will be.

I like the texture when it’s almost like ice cream. Since I usually use this ricotta to make manicotti, it gets thinner with the addition of eggs (and a little heavy cream), so this starting texture is perfect for me.

Kenji also gives a stovetop variation in The Food Lab: heat the mixture in a saucepan over medium heat until it reaches 165°F, then stir gently and let it sit for about 2 minutes before draining. I haven’t tried it myself, but since his recipes are always reliable, you might want to give it a try if you don’t use a microwave.

My Ricotta

Sunday, February 4, 2024

Vic's Chicken

Serves 2 to 4, depending on quantity and appetite

Do not substitute chicken breast halves here—the white meat does not take well to this method.

I usually cook the chicken in a 10- or 12-inch cast-iron skillet, depending on the number of pieces I’m roasting.

Please read the whole recipe through before you start, as steps are taken to avoid contamination from any bacteria that may be on the raw chicken.

If you have time, salt the chicken pieces all over, place them on a rack on a platter, and refrigerate for a few hours. This dry brining will help the chicken to crisp. However, more often than not I skip this step because I haven’t planned it long enough in advance—and it’s still great.

My preferred chicken is Bell & Evans, and I go out of my way to get it. The dried herb I use is Greek oregano from Kalustyan’s, which is dried and still on the stem; I remove it from the stems, crush it, and sift out any large bits through a coarse strainer.

Bone-in, skin-on chicken thighs or whole chicken legs, as many as you like
Vegetable oil (I use grapeseed)
Salt
Pepper, generous
Garlic powder, to taste
Dried herbs (oregano or another favorite for chicken)

Preheat the oven to 400°F. If you have a roast setting, use it now.

Have the pan you’re going to roast the chicken in ready on the counter or stove. Slick a tiny amount of oil in the pan and wipe any excess out with a paper towel.

Set a plate or platter large enough to hold the uncooked chicken next to the sink.

Place a sheet of aluminum foil in the bottom of the sink. Put the chicken pieces on the foil, and drizzle with a little oil. Season generously with salt (unless pre-salted), pepper, garlic powder, and dried herbs. Rub everything in with your hands to coat the chicken evenly.

Transfer the chicken to the plate or platter next to the sink, then place the pieces into the roasting pan.

Throw away the foil and wash your hands before touching anything else. The chicken should not have touched the sink; you can wash it to be sure, but all these steps are so the chicken does not touch the sink at all.

Put the pan in the oven and roast until the chicken is very, very crisp—45 minutes to an hour. I usually cook it for an hour because the result I want is extremely crisp, well-done chicken. I baste occasionally while it’s cooking, but I do not turn the pieces over.

Serve hot.


Friday, February 2, 2024

A Really Good Ragu

Adapted from The Kitchen Diaries by Nigel Slater (Fourth Estate, 2005)

Sauces 8 ounces of pasta generously

I’ve been making Marcella Hazan’s iconic Bolognese sauce for years, and I believe it’s the real thing. I’ve even used it to stuff inside my grandmother’s crespelle, turning them into cannelloni. But as delicious as it is, it isn’t very saucy—and sometimes I want something with a bit more sauce and umami depth. That’s what I found in The Kitchen Diaries by Nigel Slater.

I’ve been led to believe no self-respecting Italian would even think about serving Bolognese over spaghetti. But English people do, Nigel Slater does, and now sometimes so do I. That said, this sauce is especially good on rigatoni, mezzi rigatoni—or my favorite, shells, such as Faella Tofe—because it snuggles inside the crevices.

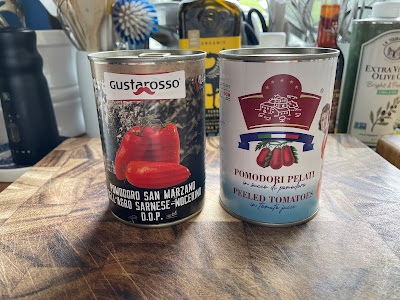
Please try to find canned tomatoes from Italy and Italian pasta cut with bronze dies and slow-dried, like Pasta Setaro or Faella. The difference is noticeable. The pasta is rough, not smooth, and sauces don't slip off. Excellent online sources for these are BuonItalia (tomatoes and Pasta Setaro) and Gustiamo (tomatoes and Faella pasta).

I often serve this on a plate with a vegetable instead of a salad. And I highly recommend opening a particularly delicious bottle of red wine to use in the sauce and drink with dinner.

Because I want this to be saucy, I’ve increased the amount of tomatoes from 1 cup to a full 400g can (check the weight on the label—that's still the small can), and decreased the meat from 1 pound to ½ pound.

4 tablespoons butter
About 3 ounces pancetta, cut in 1/4-inch cubes
1 small to medium onion, chopped
2 plump garlic cloves, coarsely chopped
1 carrot, peeled and chopped
2 stalks celery, peeled and chopped
4 ounces cremini mushrooms, chopped the same size as the onions, carrot, and celery
1 bay leaf (I use Morton & Bassett)
½ pound ground beef – the best you can get
1 400g can Italian whole peeled tomatoes, crushed by hand
¼ cup red wine (good enough to drink with dinner)
¾ cup stock (I use Better Than Bouillon Vegetable Base)
Freshly grated nutmeg – a little
Salt and pepper, to taste
¼ cup heavy cream (use a light hand)
Freshly grated Parmesan, to taste

Don’t leave out the bay leaf or the nutmeg—they both add a lot to the sauce. And remember to be parsimonious with the cream; you don’t want the sauce to be creamy.

Melt the butter, then cook the pancetta without letting it color—3 to 5 minutes—to render some of the fat. Stir in the onion and garlic, then the carrot and celery, then the mushrooms. Cook over medium heat, stirring often.

Turn up the heat a little and add the ground beef, breaking it up. Cook for about 3 minutes without stirring so the meat starts to brown. Stir again. Add the tomatoes, wine, stock, bay leaf, nutmeg, and a little salt and pepper.

Reduce the heat until the sauce is just gently moving. Partially cover the pan and cook for about an hour, stirring occasionally and checking to make sure it doesn’t dry out.

Pour in the heavy cream slowly, using a light hand. Stir and cook for another 15 to 20 minutes, keeping in mind that you don’t want the sauce to get thick. Taste and adjust seasoning.




Thursday, February 1, 2024

Hard-Boiled Eggs

Adapted from America’s Test Kitchen Twentieth Anniversary TV Show Cookbook (America’s Test Kitchen, 2019)

Makes 4 to 6 easy-peel eggs

I’ve found this method foolproof. I usually make 4 eggs at a time, but you can make up to 6. There’s no exaggerating how nice it is to have hard-boiled eggs in the refrigerator, ready for snacking, salads, or sandwiches.

These eggs are essentially steamed, not boiled.

Put 1 inch of water in a saucepan and bring it to a boil over high heat. Place a basket steamer in the pan and carefully add the eggs to the steamer. Cover and reduce the heat to medium-low. Cook the eggs for exactly 13 minutes.

While the eggs are cooking, prepare a bowl of ice water with 2 cups of ice cubes and 2 cups of cold water. I keep it in the sink.

When the 13 minutes are up, remove the pan from the heat and use tongs to transfer each egg to the ice water. Let them sit for 15 minutes before peeling.

Depending on the age of the egg, there is usually an air cell at the larger end. I find the easiest way to peel these eggs is to crack the large end, then peel under running cold water.

I was a charter subscriber to Cook’s Illustrated and have been “with them” from the beginning—from Christopher Kimball to where they’ve landed now. Even with all the changes, their mission has stayed on track. They remain an excellent source of inspiration, reliable recipes, and unbiased product reviews.

There’s a group of Cook’s recipes that has stayed in my repertoire since I first found them:

    Shrimp Salad (which includes a great way to cook shrimp for shrimp cocktail)
    The Best Sangria
    Triple-Chocolate Mousse Cake
    Basmati Rice, Pilaf Style

If you’re a digital subscriber to America’s Test Kitchen, as I am, these are all available there. This recipe—along with their method for soft-boiled eggs—is one of the most-used in my kitchen.


Caviar and Egg Mold

Adapted from Cook and Love It: A Collection of Favorite Recipes and Entertaining Ideas (The Mothers’ Club of The Lovett School, Atlanta, Georgia). Contributed by Polly Pater and Deedy Bartenfeld.

Serves 6 to 8 as an hors d’oeuvre

4 hard-boiled eggs, mashed
⅓ cup butter, softened
¼ to ⅓ cup mayonnaise (I like Ojai)
⅓ cup chopped scallions or shallots
Lemon juice
Salt to taste
½ cup sour cream (I use full-fat—Fage is my first choice; Breakstone my second)
Caviar, about ¼ cup (or more if you want to be extravagant)

Line a small bowl with plastic wrap.

Combine all the ingredients through salt. Pack the mixture into the bowl, cover with more plastic wrap, and chill well. As the butter chills, it will harden.

Unmold onto a serving plate. Frost with sour cream and top with caviar.

You can serve this with crackers, which makes it easy to put out, but I like it best with buttered white toast points—and that is what I do if the timing works.

There is excellent American caviar now available. I have tried Paddlefish and Hackelback and enjoyed both very much. However, if you can find the lightly salted Spanish grey mullet roe called Mujjol “caviar,” you are in for a treat. It is usually very well priced and delicious, especially if served with sour cream on a salted potato chip accompanied by a shot of very cold vodka or a glass of Champagne. It is worth looking out for and would work well here. Of course, Beluga caviar would work well here—as it would anywhere!—and a little would go a long way.